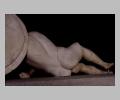
Aegina E 11, Dying Warrior in left corner of E. Ped. 2, back of figure, fr...
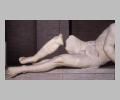
Aegina E 11, Dying Warrior in left corner of E. Ped. 2, legs, facing pedim...

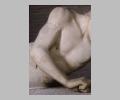
Aegina E 11, Dying Warrior in left corner of E. Ped. 2, left arm against s...

Aegina E 11, Dying Warrior in left corner of E. Ped. 2, back of feet
Aegina E 11, Dying Warrior in left corner of E. Ped. 2, upper torso and ri...
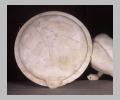
Aegina E 11, Dying Warrior in left corner of E. Ped. 2, shield, from behin...
| Collection: | Munich, Glyptothek |
| Title: | Aegina, E. Ped. 2, fig. E 11: Dying Warrior on left, Laomedon (?) |
| Context: | From Aegina, Sanctuary of Aphaia |
| Findspot: | Excavated at Aegina, Sanctuary of Aphaia |
| Summary: | Dying Warrior collapsed in left corner |
| Material: | Marble |
| Sculpture Type: | Architectural |
| Category: | Statuary group |
| Placement: | East pediment |
| Style: | Late Archaic |
| Date: | ca. 490 BC - ca. 480 BC |
| Dimensions: | L 1.78 m |
| Scale: | Life-size |
| Region: | Saronic Gulf |
| Period: | Late Archaic |
| In Group: | Aegina East Pediment 2 |
Subject Description:
The Left Dying Warrior is used compositionally as is E 6 on the right: his collapsed legs extend into the corner while he manages, slightly better than E 6, to prop up his torso and head. He has been wounded in the chest. A hole just below the right nipple preserves the entry point of the arrow. This is one of the five relatively well-preserved figures from the East Pediment found in 1811, taken to Rome for restoration and then to Munich. Though broken in many pieces, he is largely complete. The square cutting in the left hip allowed for a wooden dowel leaded directly to the floor of the pediment. Though this floor block is no longer extant, the position of his left leg and right arm place him clearly, like the Right Dying Warrior, at the front limit of the gable. The powerful head remains affixed to the torso. The fine hairs of his long beard are carved in great detail, a mustache set off to be picked out in paint. Like the warriors E 9 and E 10 he wears a Chalcidian helmet, with hinged cheekpieces added, the right one still in place. His helmet carried a crest, added separately. Because this older figure, "kingly" in appearance, is the principal victim of Herakles, Ohly has identified him as the Trojan king Laomedon. According to tradition he cheated Herakles, who later killed him with an arrow in the first campaign against Troy.
Form & Style:
In terms of pose, E 11 is one of the most advanced and technically daring figures of the East Pediment. In the new reconstruction of the right leg it hangs dramatically in mid-air, as if the figure has just collapsed and not yet hit the ground. Like the Dying Warrior on the right he appears to roll toward the edge of the pediment. His hand and left foot have broken through the frontal plane and project well beyond the edge. His head, also near the edge, faces down to the viewer below. His powerful nude form is subtly modeled, the bone and muscles in response to the twists of his body, the veins popping out. Like the other wounded figures of this pediment he has lost his grip on the shield. His lips are parted slightly; the teeth are visible behind. His features are large, the eyes especially heavily rimmed, the mouth cut with the unintentional hint of a smile like the East Athena, with whom Ohly associates this figure.
Condition: Nearly complete
Condition Description:
Many fragments rejoined; two fragments of lower right leg are in Aegina; all others are in Munich.
Material Description:
Parian Marble
Associated Building: Aegina, Temple of Aphaia